Speed up your XP and Vista by hack its system registry
Do you know that your computer is like your car: it needs periodic maintenance to keep it running at optimum performance. Installing and un-installing programs, surfing the Internet, emailing, and other everyday activities create a sort of “sludge” that builds up in your computer over time, much like an automobile engine. After a while, it doesn't startup like when it was new, it stalls unexpectedly, and performance is sluggish on the (information) highway.

Of course, the fastest and easiest way to speed-up your computer is to allow a software program to do it for you! Although you will find that all of the adjustments in this book will speed up your system, the most effective and easiest way to give your computer blazing speed is to clean up your system’s Registry.
We strongly recommend running a free Registry scan to find out how many errors you computer is hiding from you. Your computer will likely have hundreds of Registry errors that are dramatically slowing down the potential speed and performance.
Or you can try the shareware of these registry cleaner programs, such as System Cleaner, Registry First Aid, RegSeeker or TuneUp Utilities 2009 for tune up your Windows XP and/or Vista.
Disabling Vista’s User Account Control (UAC)
User Account Control (UAC) is a feature in Windows Vista that can help prevent unauthorized changes to your computer. UAC does this by asking you for permission or an administrator* password before performing actions that could potentially affect your computer's operation or that change settings that affect other users.
UAC will alert you with one of the following messages:
Windows needs your permission to continue
A Windows function or program that can affect other users of this computer needs your permission to start. Make sure to ensure that it's a function or program you want to run.
A program needs your permission to continue
This will happen when a program that's not part of Windows needs your permission to start. It has a valid digital signature indicating its name and its publisher, which helps to ensure that the program is what it claims to be. Make sure that this is a program that you intended to run.
An unidentified program wants access to your computer
This is caused by a program that your administrator has specifically blocked from running on your computer is trying to run. To run this program, you must have an administrator unblock it.

The main reason to use UAC is to prevent malware and spyware from installing or making changes to your computer without your permission. This comes in handy when you have users who may go to inappropriate websites or download software from the Internet that may be of risk to their computer. If you trust your users or if its just you that will be using your computer and you are confident that you will not be installing anything you shouldn’t then you can turn this feature off.
Here is how you turn the User Account Control feature off:
UAC will alert you with one of the following messages:
Windows needs your permission to continue
A Windows function or program that can affect other users of this computer needs your permission to start. Make sure to ensure that it's a function or program you want to run.
A program needs your permission to continue
This will happen when a program that's not part of Windows needs your permission to start. It has a valid digital signature indicating its name and its publisher, which helps to ensure that the program is what it claims to be. Make sure that this is a program that you intended to run.
An unidentified program wants access to your computer
This is caused by a program that your administrator has specifically blocked from running on your computer is trying to run. To run this program, you must have an administrator unblock it.
The main reason to use UAC is to prevent malware and spyware from installing or making changes to your computer without your permission. This comes in handy when you have users who may go to inappropriate websites or download software from the Internet that may be of risk to their computer. If you trust your users or if its just you that will be using your computer and you are confident that you will not be installing anything you shouldn’t then you can turn this feature off.
Here is how you turn the User Account Control feature off:
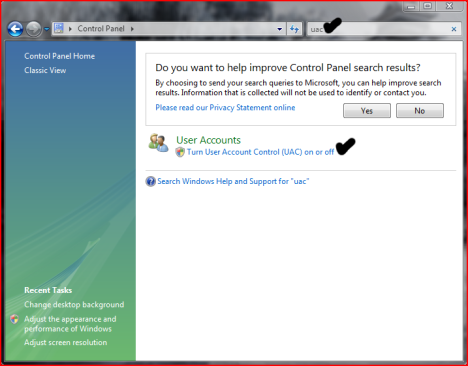
- Open User Accounts from Control Panel.
- Click on turn User Account Control on or off.
- Uncheck the box that says Use User Account Control (UAC) to help protect your computer.
- Click Ok. You may have to enter administrator credentials depending on who you are logged in as.
- Restart your computer for the changes to take effect.
Mac OS X LEOPARD Transformation Pack for Windows VISTA


A full-fledged OS X Leopard Transformation Pack that transforms your Vista into Leopard. Now includes a working uninstaller.
Still, make sure you create a system restore point before installing the theme,
in case the uninstall does not work and you want to go back to original Vista theme.
Those who can not uninstall the old version, should upgrade to the new version and try uninstalling using the new uninstaller.
Download the installer at Here and the uninstaller at Here. Enjoy!
Make Your XP Logon Screen Look Like Vista
Have you ever wondered how to change the default Windows XP logon screen? Now I got the idea to figure out how to make it look like Windows Vista instead, so I'm writing that up for you.
First, you'll have to download and install the free LogonStudio application and make sure that it is set as the default logon handler, which is easy since it will prompt you when you first open it. (Note that this is the same application you can use to customize Windows Vista's logon screen.)
The three default welcome screens aren't very impressive, but there's a ton of great ones on the wincustomize site, including the Vista one you see here.

Next, download and open the Windows Vista Ultimate Logon screen for XP, and select it in LogonStudio as shown above. Once you hit the Apply button, you'll see your Vista-style logon screen for XP:

Note that this will not work if you are logging into a domain, or if you use the classic style logon with Ctrl+Alt+Del.
Wednesday, February 27, 2008
Unlock Your Files or Folder with Free Unlocker!
Even get rid of error message like Error deleting file or folder, cannot delete folder: it's being used by another person or program? Now, you can use this freeware to solve that problem: Unlocker!

Unlocker is a very useful Windows Explorer extension allowing users with a simple right-click on a file or folder to easily get rid of error message such as error deleting file or folder, cannot delete folder: it's being used by another person or program.
Helps delete locked files with error messages like:
Cannot delete file: Access is denied
There has been a sharing violation.
The source or destination file may be in use.
The file is in use by another program or user.
Make sure the disk is not full or write-protected and that the file is not currently in use.
Unlocker 1.8.5 is 100% FREE, which means it is a freeware product (both for personal and commercial use) that does not contain any form of malware, including but not limited to: spyware, viruses, trojans and backdoors.
This software product was tested thoroughly and was found absolutely clean, therefore it can be installed with no concern by any computer user.
You can download Unlocker, now on version 1.85 at Here, and reach more info on its site.
Vista Transformation Pack v7 NEW
 This release has overall improvements for features compared to previous versions and has a lot of user interface refinements for ease of use with end-user.
You will find this program is amazingly easier comparing to all other shell packs. Let's see the changelog of this release.
Changes in Version 7.0:
-Added default system font option for recovery
-Added Docking support for preview and taskbar replacement
-Added DPI auto-detection in Machine Configuration
-Added hiding menubar option for Vista (Styler) toolbar
-Added information about KB925902 hotfix issues and solution on startup
-Added memory requirements checking for 3rd-party applications
-Added resetting DPI options and some extra information in Machine Configuration
-Added screen resolution auto-detection
-Added setting cleartype font automatically after the transformation
-Added Vista transformation "Express mode" (Make an appropriate setup configuration in single page!)
-Added ViStart (Vista Start Menu port for Windows XP/2003 with glass UI and search function)
-Added uninstalling existing components before updating
-Added WindowBlinds detection warning message (for user who is mistaken about glass border skin)
-Added Windows Server 2003 Service Pack 2 uxtheme patching support
-Fixed backing up system files bug on repair mode
-Fixed checking for Styler incompatibility with x64 edition OS
-Fixed fileversion checking bug that cause backup system files being overwritten by modified system files when update
-Fixed operating system checking bug (that allow user to install in Windows 2000 and below)
-Fixed Start Orb positioning bug
-Fixed Styler to execute Styler.exe only when user wants to hide menu bar to save up memory and some weird issues
-Fixed Styler to run in toolbar mode (prevent error and message popup)
-Fixed Vista (Styler) toolbar option with correction of menubar
-Fixed uninstalling bug with system drive icon
-Fixed uninstalling routines
-Fixed uxtheme.dll patching detection bugs on machine without any service pack
-Fixed Windows Live Messenger skin uninstallation bug
-Moved extra dialogs in the main dialogs process so user can make all decisions before transforming
-Removed customized open/save dialog due to bugs in some applications
-Replaced closeapp with pskill (some programs reported closeapp as virus though it isn't)
-Replaced Blaero's Start Orb with ViOrb (Auto positioning and snap over the start button upon taskbar shifting)
-Updated battery tray icons
-Updated Getting Started and Help and Support FAQ
-Updated LClock x86 to version 1.62b
-Updated Maintenance Center to be Welcome Center
-Updated minor UI graphic resources in themes
-Updated Segoe UI font
-Updated Shutdown/Logoff dialogs
-Updated Start Orb to full circle version
-Updated Thoosje's Vista sidebar to version 2.1
-Updated transformation to use backup system file if it has the same fileversion during update
-Updated updating function to uninstall previous components before updating
-Updated Vista logon screen (Thanks to SoFtEcH for updating my logon)
- Added status message (Welcome, Shutdown, etc.)
- Fixed user account disapperance bug on lower resolution
- Fixed user account moving around when focused
- Moved shutdown button to right part
- Updated password panel resources
- Updated userpicture's frame border
Download This at Here.
Windows Vista Tiny (Fits on a CD!)
We can try this special eXPerience edition of Windows Vista Ultimate. Windows is fully patched with all "important" Windows Updates to 8th may 2007. The 512Mb RAM memory requirement is reduced to just 256Mb. The requirement of almost 8Gb of disk space is reduced to less than 3Gb. This installation only takes up about 35% of the size of a normal installation of Windows Vista. Many components have been removed from this edition of Windows, but you still have Microsoft's three main programs:

You also have the new Aero theme in this edition of Windows and the ability to use Windows Update.
There are no services taken out of this special edition of Windows. Only three services have been disabled:
There are concerns about finding a good firewall and antivirus for Windows Vista. If you want to use a good antivirus, get hold of NOD32 v2.70.31 (or later) and use the NSANE fix. For a firewall, you're stuck with the built in firewall it seems, at least until software vendors start to make Vista compatible firewalls. On June 7th 2007, Comodo Firewall version 3 is due for release - this will have Vista support.
The eXPerience folder on the CD contains the following folders:
DirectX DLL Files
Despite Windows Vista being an absolutely massive operating system, it still does not even include DirectX DLL files! What were Microsoft thinking? So if you need the DirectX 9 DLL files (d3dx9_24/25/26/27/28/29/30/31/32/33.dll) you can just double click the file in this folder to extract these 10 DLL files to system32. This will keep compatibility with games you might have stored on another drive from a previous installation.
Ethernet Drivers
Despite Windows Vista being an absolutely massive operating system, it still does not even include some Ethernet Drivers! What were Microsoft thinking? So if your Ethernet card is not working after installing Windows Vista and it needs its driver installing, you can use the Ethernet Driver pack thats included in this folder. Follow the instructions in the ReadMe.txt file. After installing your Ethernet Card, see if your onboard sound is working, IT PROBABLY WON'T BE, it seems Microsoft forgot to include Realtek AC97 sound drivers in Windows Vista, this is ridiculous considering almost every motherboard in the world has Realtek AC97 sound! Its almost as if Microsoft are trying to annoy people on purpose, they give you a 2.5Gb+ DVD sized Operating System WITHOUT Ethernet Drivers, Sound Drivers or DirectX DLL files.
How To Install Windows
This unattended version of Windows is very easy to install. You can only install this edition of Windows onto a formatted partition or hard drive, in other words, you cannot do an upgrade installation from within Windows. To find out all the information on how to install this edition of Windows, open the eXPerience folder that is on the CD and open the file "2 - How To Install Windows.htm" This guide will show you exactly what to do, with full images of the setup screens.
Custom Tweaks
This edition of Windows is heavily modified for the best possible user experience, with more than 120 registry tweaks, you can see all the details of the changes made by looking at the file "5 Custom Tweaks.htm" that is in the Release Info folder in the eXPerience folder on the CD.
Removed Components
This CD sized release of Windows Vista has had the following components removed using vLite:
Accessories
Drivers
Games
Languages
Multimedia
System
Windows Updates
This special eXPerience edition of Windows Vista includes all the "important" Windows Updates up to Tuesday, May 8th, 2007. These hotfixes are installed silently near the end of the Windows install process...
KB890830, KB925902, KB928089, KB929399, KB929735, KB930178, KB930857, KB931573, KB931768, KB932246, and KB936824
You can download this Tiny Vista at Here (We divide to 8 parts):
Part1 Part2 Part3 Part4
Part5 Part6 Part7 Part8
After that, use a program like ISOBuster to extract/burn the ISO.
Enjoy your Faster and Tiny Vista!
- Internet Explorer 7
- Windows Mail (Formerly "Outlook Express")
- Windows Media Player 11

You also have the new Aero theme in this edition of Windows and the ability to use Windows Update.
There are no services taken out of this special edition of Windows. Only three services have been disabled:
- Remote Registry
- Windows Error Reporting Service
- Windows Search
There are concerns about finding a good firewall and antivirus for Windows Vista. If you want to use a good antivirus, get hold of NOD32 v2.70.31 (or later) and use the NSANE fix. For a firewall, you're stuck with the built in firewall it seems, at least until software vendors start to make Vista compatible firewalls. On June 7th 2007, Comodo Firewall version 3 is due for release - this will have Vista support.
The eXPerience folder on the CD contains the following folders:
DirectX DLL Files
Despite Windows Vista being an absolutely massive operating system, it still does not even include DirectX DLL files! What were Microsoft thinking? So if you need the DirectX 9 DLL files (d3dx9_24/25/26/27/28/29/30/31/32/33.dll) you can just double click the file in this folder to extract these 10 DLL files to system32. This will keep compatibility with games you might have stored on another drive from a previous installation.
Ethernet Drivers
Despite Windows Vista being an absolutely massive operating system, it still does not even include some Ethernet Drivers! What were Microsoft thinking? So if your Ethernet card is not working after installing Windows Vista and it needs its driver installing, you can use the Ethernet Driver pack thats included in this folder. Follow the instructions in the ReadMe.txt file. After installing your Ethernet Card, see if your onboard sound is working, IT PROBABLY WON'T BE, it seems Microsoft forgot to include Realtek AC97 sound drivers in Windows Vista, this is ridiculous considering almost every motherboard in the world has Realtek AC97 sound! Its almost as if Microsoft are trying to annoy people on purpose, they give you a 2.5Gb+ DVD sized Operating System WITHOUT Ethernet Drivers, Sound Drivers or DirectX DLL files.
How To Install Windows
This unattended version of Windows is very easy to install. You can only install this edition of Windows onto a formatted partition or hard drive, in other words, you cannot do an upgrade installation from within Windows. To find out all the information on how to install this edition of Windows, open the eXPerience folder that is on the CD and open the file "2 - How To Install Windows.htm" This guide will show you exactly what to do, with full images of the setup screens.
Custom Tweaks
This edition of Windows is heavily modified for the best possible user experience, with more than 120 registry tweaks, you can see all the details of the changes made by looking at the file "5 Custom Tweaks.htm" that is in the Release Info folder in the eXPerience folder on the CD.
Removed Components
This CD sized release of Windows Vista has had the following components removed using vLite:
Accessories
- Accessibility
- Speech Support
- Welcome Center
Drivers
- Display Adapters
- Modems and Printers
Games
- Game Explorer
- Inbox Games
- Premium Inbox Games
Languages
- Japanese
- Korean
- Simplified Chinese
- Traditional Chinese
Multimedia
- Media Center Movie and DVD Maker
- Screensavers
- Wallpapers
- Windows Media Samples
System
- BitLocker Drive Encryption
- Help
- Microsoft Agent
- Natural Language
- Security Center
- Tablet PC
- Windows Defender
- Windows Easy Transfer
Windows Updates
This special eXPerience edition of Windows Vista includes all the "important" Windows Updates up to Tuesday, May 8th, 2007. These hotfixes are installed silently near the end of the Windows install process...
KB890830, KB925902, KB928089, KB929399, KB929735, KB930178, KB930857, KB931573, KB931768, KB932246, and KB936824
You can download this Tiny Vista at Here (We divide to 8 parts):
Part1 Part2 Part3 Part4
Part5 Part6 Part7 Part8
After that, use a program like ISOBuster to extract/burn the ISO.
Enjoy your Faster and Tiny Vista!
Top Ten Tips To Improve System Speed

Here's the Top Ten Tips To Improve Your Windows System More Speedy:
- Let your PC boot up completely before opening any applications.
- Refresh the desktop after closing any application. This will remove any unused files from the RAM.
- Do not set very large file size images as your wallpaper. Do not keep a wallpaper at all if your PC is low on RAM (less than 64 MB).
- Do not clutter your Desktop with a lot of shortcuts. Each shortcut on the desktop uses up to 500 bytes of RAM
- Empty the recycle bin regularly. The files are not really deleted from your hard drive until you empty the recycle bin.
- Delete the temporary internet files regularly.
- Defragment your hard drive once every two months. This will free up a lot of space on your hard drive and rearrange the files so that your applications run faster.
- Always make two partitions in your hard drive. Install all large Softwares (like PSP, Photoshop, 3DS Max etc) in the second partition. Windows uses all the available empty space in C drive as virtual memory when your Computer RAM is full. Keep the C Drive as empty as possible.
- When installing new Softwares disable the option of having a tray icon. The tray icons use up available RAM, and also slow down the booting of your PC. Also disable the option of starting the application automatically when the PC boots. You can disable these options later on also from the Tools or preferences menu in your application.
- Protect your PC from dust. Dust causes the CPU cooling fan to jam and slow down thereby gradually heating your CPU and affecting the processing speed. Use compressed air to blow out any dust from the CPU. Never use vacuum.
Note: RAM IS THE WORKING AREA (DESKTOP) OF THE CPU, KEEP IT AS EMPTY AND UNCLUTTERED AS POSSIBLE!
Be Light Your Vista with vLite!

Windows Vista from Microsoft takes a lot of resources, we all know that. So here is the tool for easy removal of unwanted components and bootable ISO creation in order to make Vista run faster and to your liking.
vLite is a tool for customizing the Windows Vista installation before actually installing it. This tool doesn't use any kind of hacking, all files and registry entries are in their original form and protected as they would be if you install the full version only without the components you select for the removal.
It configures the installation directly before the installation, meaning you'll have to remake the ISO and reinstall it. This method is much cleaner, not to mention easier and more logical than doing it after installation on every reinstall.
For more info and download link, visit here. Its Free!
New Updates for Vista
Here are new Updates for Windows Vista. (KB942089), (KB942089), (KB940069), (KB940069), (KB943544), (KB943544)..
Install this update to resolve an issue where Omniquad Firewall and TT Firewall Version 2.0.3 fail to install on systems running Windows Vista.
Update for Windows Media Center for Windows Vista (KB927084)
Update for Windows Media Center for Windows Vista for x64-based Systems (KB927084)
Install this update to resolve an issue where Omniquad Firewall and TT Firewall Version 2.0.3 fail to install on systems running Windows Vista.
Update for Windows Vista (KB942089)Install this update to resolve an issue where an indexing service query, using a LIKE predicate, returns an incorrect result on a system running Windows Vista.
Update for Windows Vista for x64-based Systems (KB942089)
Update for Windows Vista (KB940069)Update for Windows Vista for x64-based Systems (KB940069)Install this update to resolve an issue where a duplicate or incorrect date is displayed on the Windows Vista Sidebar Calendar gadget.
Update for Windows Vista (KB943544)Update for Windows Vista for x64-based Systems (KB943544)Install this update to resolve an issue where connecting to a non-UNC (Uniform Naming Convention) printer fails on a system running Windows Vista.
Update for Windows Vista (KB941542)Install this update to resolve an issue where the computer continually restarts with Microsoft Windows Pre-installation Environment (Windows PE) 2.0 on an AMD Barcelona processor, and the Operating System Capabilities ( _OSC ) method enabled in the BIOS.
Update for Windows Vista for x64-based Systems (KB941542)
Update for Windows Vista (KB942813)Install this update to resolve suspend and resume issues on Windows Vista systems configured with a digital cable tuner.
Update for Windows Vista for x64-based Systems (KB942813)
Update for Windows Media Center for Windows Vista (KB938929)Install this update to resolve suspend and resume issues on Windows Vista systems configured with a digital cable tuner.
Update for Windows Media Center for Windows Vista for x64-based Systems (KB938929)
Update for Windows Media Center for Windows Vista (KB927084)
Update for Windows Media Center for Windows Vista for x64-based Systems (KB927084)
The Hidden Windows Vista Tools
 The default installation of Windows Vista weighs in at approximately 8 GB. In fact, Microsoft's latest operating system won't even install with less than 15 GB of space available on the hard drive. This is valid for both the low-end and the high-end editions of the platform.
A full Vista installation will take up no less than 40 times more hard disk space compared to Windows 95's 200 MB and five times more than Windows XP's 1.5 GB. Part of the reason why Vista hugs so much hard disk real estate space is the fact that the operating system brings to the table a plethora of built-in administrative tools that ship by default with the platform.
In this context, the term hidden, is not entirely accurate. Advanced users and system administrators have no problems tracking down and using the administrative tools in Vista. But at the same time, an average user could pass right by them, just because of their low footprint in the operating system's fabric, as they simply have a way to go by virtually undocumented and unnoticed.
But this does not mean that the tools are not there, it just requires a bit of digging under the surface. And you will be surprised of how many long-time Windows users have failed to take a deeper look under the hood of the operating system, even if it would make their life so much easier.
You'll be surprised of what is lying beneath. But at the same time you have to understand that a large part of these utilities are not new to Vista, although they all suffered enhancements. Some of them are obviously survivors from older editions of Windows. But this is besides the point. You should at least be aware of the luxuriant resources within your grasp, provided of course that you are running Windows Vista.
Also, while the tools exemplified in this article are to a certain degree common to all SKUs of Vista, you would do better to focus on the high-end editions of the operating system, such as Business, Enterprise and Ultimate, and less on Home Basic and Home Premium, as some items might be missing or limited in functionality on the latter two examples of the platform.
1. Task Manager
Right, I thought I would debut with something as common as the Start Menu. The Windows Task Manager can be launched via Ctrl + Shift + Esc, or by Alt + Ctrl + Delete, as well as by right clicking the Taskbar and choosing Task Manager from the options in the contextual menu that pops up. The Windows Task Manager in Vista is designed to run with standard user privileges, and as such, will not deliver a User Account Prompt. The tool will permit you to manage Applications, Processes, Services, and to monitor Performance, Networking and the active Users through the corresponding tabs. If you are looking to kill a program that is not responding, identify the process associated with a certain program or simply check the CPU cycles or the amount of system memory cached, then Task Manager is the simplest and most accessible tool.
2. Network and Sharing Center
"The Network and Sharing Center puts you in control of your network connectivity. It's a place where you can check your connection status, view your network visually, and troubleshoot connection problems. The Network and Sharing Center informs you about your network and verifies whether your PC can successfully access the Internet—then summarizes this info in the form of a Network Map," reads a fragment of Microsoft's description of the resource.But the Network and Sharing Center is only the surface of the Windows Network Diagnostics tool in Windows Vista, an automated utility designed to identify, diagnose and resolve connectivity problems. And in its turn, the Windows Network Diagnostics tool is just a part of the Network Diagnostics Framework (NDF) in Vista. Every time you will run into connectivity issues, NDF can provide a way out. The Network and Sharing Center is located under Control Panel, Network and Internet.
3. Backup, Shadow Copies, System Restore
There is an intimate connection between backup, shadow copies, system restore and restore points in Windows Vista. And there are two locations that will permit you to both have a general perspective of the status of the capabilities mentioned and to configure them, the Backup Status and Configuration and the Backup and Restore Center. Both can be launched by entering "Backup" in the search box under the Start Menu.
Via the Backup Status and Configuration you will be able to manage automatic file backup and handle the settings, as well as perform advanced restore or a complete PC backup. The Backup and Restore Center offers basically the same functionality but is additionally focused on creating system restore point and activating the shadow copies’ features.
4. Windows BitLocker Drive Encryption
Available exclusively in Windows Vista Enterprise and Ultimate, Windows BitLocker Drive Encryption is designed to help ensure the privacy of sensitive data by encryption. Although the default configuration of BitLocker requires a Trust Platform Module, the fact of the matter is that TPMs are rare in use outside of corporate environments, but users will be able to use the tool nonetheless, although without some functionality. With Windows Vista SP1, the Redmond company will also allow users to encrypt additional volumes on top of the operating system drive, protected by default.
"During computer startup, if BitLocker detects a system condition that could represent a security risk (for example, disk errors, a change to the BIOS , or changes to any startup files), it will lock the drive and require a special BitLocker recovery password to unlock it. Make sure that you create this recovery password when you turn on BitLocker for the first time; otherwise, you could permanently lose access to your files", is the warning Microsoft provides with the use of BitLocker.
5. Program Compatibility Wizard
The Program Compatibility Wizard under Control Panel and Programs will permit you to use an older program with Windows Vista. The tool is designed to help users that are experiencing functionality issues with an application in Vista, although the problems were not there with a prior version of Windows. The wizard will detect all the programs installed, and also permit the selection and testing of compatibility settings. Everything from display settings, to desktop composition and to administrative privileges can be set through the wizard.
6. Microsoft Management Console 3.0
"Microsoft Management Console (MMC) hosts administrative tools that you can use to administer networks, computers, services, and other system components," reads an excerpt of the Redmond company's description of the resource. The Microsoft Management Console 3.0, also known as Console Root or Console 1, has been around since Windows 2000. You can open it by typing "mmc" in the Search box under the Start menu, in a Run dialog box or in a command prompt window. MMC is essentially not an administrative tool, as it does not perform any such tasks, but it does provide hosting for various components including: Local security Policy, Computer Management, Event Viewer, and the Reliability and Performance Monitor as snap-ins which can be added for local or remote computers on the network.
7. Computer Management
Computer Management is a collection of administrative components. Accessible by entering "Computer Management" in the Search box under Start Menu, you can find items placed in three categories: System Tools, Storage and Services and Applications. Computer Management comes with the Task Scheduler, Event Viewer, Shared Folders, Local Users and Groups, the Reliability and Performance Monitor, Device Manager, Disk Management, as well as Services and WMI Control.
8. WMI - Windows Management Instrumentation
"Effective management of PC and server systems in an enterprise network benefits from well-instrumented computer software and hardware, which allow system components to be monitored and controlled, both locally and remotely. Microsoft is committed to simplifying instrumentation of hardware and software under Microsoft Windows operating systems. Microsoft is also committed to providing consistent access to this instrumentation for both Windows-based management systems and legacy management systems that are hosted in other environments. The foundations for manageability in Windows operating systems are Windows Management Instrumentation (WMI; formerly known as WBEM) and WMI extensions for Windows Driver Model," reveals the company's introduction on WMI.9. Services
Typing "Services" in the Search box under the Start Menu will open the tool with exactly this name. Essentially, the utility will provide an exhaustive list of all the processes in Windows Vista complete with name, description, status and startup type. The console will allow you to stop, restart or start various services across the operating system, as well as getting an insight into all the properties of the services enumerated by the tool.
10. Disk Management
Disk Management in Windows Vista is under Control Panel, System and Maintenance, Administrative Tools, Computer Management, Storage. A breeze to navigate if you were to ask me. The system utility will help you manage partitions and hard disks. Disk initialization, creating volumes, and formatting with the FAT, FAT32, or NTFS file systems are all tasks offered by Disk Management.
11. Device Manager
"Device Manager provides you with a graphical view of the hardware that is installed on your computer. All devices communicate with Windows through a piece of software called a device driver. You can use Device Manager to install and update the drivers for your hardware devices, modify hardware settings for those devices, and troubleshoot problems", is the overview Microsoft provides of the tool.Device Manager permits users to modify hardware configuration settings, get a complete overview of all devices, perform device drivers installation and uninstallation actions, as well as enable and disable certain items.
12. Windows Reliability and Performance Monitor
Under Control Panel, System and Maintenance, Administrative Tools, the Windows Reliability and Performance Monitor is the big brother of the monitoring features provided by the Task Manager. The tool will offer a closer view at the CPU, the hard disk, Network activity and System Memory. Users can both monitor the system's performance in real time or choose to create logs of data collected and stored for further analysis.
13. Local Users and Groups
This is the perfect location to manage accounts in Windows Vista. You will be able to create and handle user accounts and the details related to them such as Groups and privileges. The Local Users and Groups console offers a location to activate the two built-in accounts that ship with Vista: Guest and Administrator. While Guest can be all but ignored, I am sure that the account for the Absolute Administrator of Vista is the kind of freedom some users will want.
14. Event Viewer
"The Event Viewer is a Microsoft Management Console (MMC) snap-in that enables you to browse and manage event logs. It is an indispensable tool for monitoring the health of systems and troubleshooting issues when they arise. Event Viewer enables you to perform the following tasks: view events from multiple event logs; save useful event filters as custom views that can be reused; schedule a task to run in response to an event and create and manage event subscriptions", reads the tool's overview.15. Task Scheduler
The Task Scheduler is also hosted under Control Panel, System and Maintenance, Administrative Tools and the name is pretty much explanatory. You can use the tool to schedule automated tasks in concordance with a specific time or a certain event. The utility will also offer a complete library of scheduled tasks allowing you to delete unnecessary items, in addition to options such as run, disable and modify.
16. Memory Diagnostics Tool
Normally, you will access the Memory Diagnostics Tool via the Windows Vista installation disk. But there is also another way. The utility can be found under Control Panel, System and Maintenance, Administrative Tools and, when launched, it will offer to restart immediately and check for RAM problems, or analyze the system memory the next time the computer is started. This is a very useful tool that will identify and diagnose memory problems.
17. System Configuration
System Configuration can be launched by entering "msconfig" in the Search box under the Start menu. It will offer users five tabs and with them the possibility to manage the startup process, boot options, the services across Vista, a reduced list of start-up items as well as providing shortcuts to a range of tools in the operating system. Under the Tools tab, you will be able to find some more hidden Vista goodies such as Internet Protocol Configuration, UAC and easy access to the registry.
18. System Information
"System Information (also known as msinfo32.exe) shows details about your computer's hardware configuration, computer components, and software, including drivers," reads the general description of the tool. System Information offers users a view over System Summary, the Hardware Resources and the Software Environment. The tool will display information about the operating system and its general settings, hardware and programs. Just type "msinfo32.exe" in the Search box under the Start Menu in order to launch it.
19. Windows Firewall with Advanced Security
Windows Firewall with Advanced Security is a bit of a hidden gem in Windows Vista. Located under Control Panel, Administrative Tools the tool is a bundle between a host firewall and Ipsec. If you want control over packets for IPv4 and IPv6 traffic, then this utility is the right answer for you, no doubt about it. You will be able to configure rules that will then apply to all incoming and outgoing traffic.
20. Local Security Policy
Also placed under Control Panel, Administrative Tools, the Local Security Policy will allow you to configure policies for the Vista Accounts, Local Policies, Public Key Policies, Software Restrictions Policies, IP Security Policies on Local Computer and the Windows Firewall with Advanced Security.
Source: Marius Oiaga, Softpedia.com
Compatibility, Reliability, and Stability of Vista Update

About 2 months ago Microsoft released a couple of hotfixes that improved the stability and reliability of Windows Vista, these were not made available on Automatic Updates.
That aside, Microsoft has released an update to the compatibility, reliability, and stability of Windows Vista fix that further improves the reliability of your system.
The original fix improved annoyances such as file copy calculation & speed from within windows to other (local or network) drives.
This update improves the compatibility, reliability, and stability of Windows Vista. This update includes the following improvements:
- It extends the battery life for mobile devices.
- It improves the stability of portable computers and of desktop computers that use an uninterruptable power supply (UPS).
- It improves the reliability of Windows Vista when you open the menu of a startup application.
- It improves the stability of wireless network services.
- It shortens the startup time of Windows Vista by using a better timing structure.
- It shortens the recovery time after Windows Vista experiences a period of inactivity.
- It shortens the recovery time when you try to exit the Photos screen saver.
- It improves the stability of Windows PowerShell.
- A compatibility issue that affects some third-party antivirus software applications.
- A reliability issue that occurs when a Windows Vista-based computer uses certain network.
Download: Update for Windows Vista x64-based versions (KB941649) package validation required
source: Microsoft Support
Enable Aero even if Windows doesn't allow it
Windows Vista has a sweet little new interface called Windows Aero, call it another theme for windows. The problem is that this does not work on every pc configuration, it only works on system that windows finds fit for it to be used on.
Follow these steps and you will be able to re-enable Aero even if Windows doesn't allow it:
Enjoy the Aero Experience!
Follow these steps and you will be able to re-enable Aero even if Windows doesn't allow it:
- Click Start, Run.
- Type regedit
- Navigate to HKEY_LOCAL_MACHINE\Software\Microsoft
- Create a key called WDM.
- Inside of that key, create a new DWORD value called EnableMachineCheck, and set it to 0
- Create another DWORD called Blur, and set that to 0
- Create another DWORD called Animations and set that to 0.
- Restart Your Vista
Enjoy the Aero Experience!
Vista System Restore
Are you one of the many computer users who went from using Windows XP to Windows Vista? It seems to be “the thing to do” these days, but let’s be honest here.
Are you having trouble finding some of the things you absolutely loved using in XP? How about the system restore feature, for example? I know that’s one of my favorites, but it’s so difficult to find in Vista. Well, today I’m going to give you the lowdown on how you can easily find it and start using it once again!
To get to the system restore window, right click on the Computer icon on your desktop and choose Properties. From there, click on the System Protection link on the left hand side. Another box will come up asking you if you want to continue on or cancel. Click Continue and then make sure you’re under the System Protection tab. At the top of the window, there’s a link you can click on to learn about how much disk space you need to do a system restore, etc. You can do that if you’d like or you can just move on.
To do an actual system restore, just click on the System Restore button and go through the process. Or, if you’d like to create your own restore point, click on the Create button. Type in a few key words for the point you’d like to go back to and then hit Create again. Go through the steps and you’ll be all set. In the middle of the window, you’re able to see all of the restores you’ve done in the past. So, if this is your first time, you’ll see all of them the next time you go in to do a system restore. When you’re all done, click OK and you’ll be good to go. So, from now on, you don’t have to worry about not being able to find the system restore option in Windows Vista.
Use your Flash Disk as a Temporary RAM in Vista

Till this date, Microsoft’s windows had two options for the memory requirement of the computer, so that the computing can be done at cheaper rates and that too without installing the physical memory.
- Physical Memory (RAM)
- Page File (A virtual memory file, stored on hard disk).
The page file is used by the Windows OS to cater the needs of various applications when the physical memory is fully used up. The reason for that is, that Virtual memory is slower as compared to the physical memory and thus Phyical memory takes the first priority.
However, with the release of Windows Vista, Microsoft has introduced a new technology called ReadyBoost. With the help of this technology one can use any Flash drive, SD Cards, CF Cards as the third memory option for the computer.
Now, the benefits of Flash Drive or Cards as a source of Memory :
- It is faster than the virtual memory which is accessed through the hard disk drive.
- It is cheaper as compared to the actually Physical Memory.
How can it be activated ?
In order to activate the ReadyBoost technology on your FlashDrive or Memory Cards, you have to follow these steps:
- Open My Computer.
- Right Click on the Removable Disk Drive and select Properties.
- Click on ReadyBoost Tab.
- Enable the feature by selecting the option and allocate the amount of space you want to use as memory.
Note:
- Regardless of the fact that you use Readyboost or not, you need at least 512 Mb of memory to run Windows Vista decently.
- If your device is not giving the option of ReadyBoost then it means that it doesn’t clear up the minimum data trasfer rate required by ReadBoost technology.
How to Hack your Windows Experience Index
 The results of the Windows Experience Index are stored in an XML file that you can modify to spoof your score.
Who wants to show off a 2.1 system?
Let’s make that a 9.9 powerhouse.
- Navigate to C:\Windows\Performance\WinSAT\DataStore.
- Open up the most recent file in that folder. Make sure that your account has write access to that file. If not change the file permissions.
- Parse the file looking for the WinSPR entry. These are the items you want to edit. The maximum value you can use is 9.9.

- Save the file and you just turned your 2.1 system into a supercomputer.
Speed Up Your External Storage in Vista

Windows Vista operates external hard drives that are connected with USB differently than internal drives.
Write caching is disabled so that you can safely remove the drive at almost any time.
This is a great feature for USB thumb drives that are frequently inserted and removed from your computer. But if you have a large hard drive that is in an external enclosure that you never disconnect from your computer, write caching is also disabled which can decrease performance.
This tweak is going to show you how to increase the performance of your external hard drives by turning write caching back on as well as activating advanced performance. Let’s get started:
- Click on the start button, then right click on Computer and select Manage.
- Click on Device Manager on the side menu.
- Expand Disk drives and locate your external drive from the list.
- Right click on the drive and select Properties.
- On the Policies tab, select Optimize for performance.
- Next, check Enable write caching on the disk and Enable advanced performance.
- Hit OK, then restart your computer.
Enjoy !
FireFox Theme for Windows Vista: Free Download

Here is free theme for your Vista. Its very very very cool theme. Feel free to download it and make your Vista fashionable! You can download its theme here.
Tweak Aero's glass borders: Vista Hack
 The borders around system windows, such as dialog boxes and the Control Panel, are transparent in Windows Vista's Aero interface. These borders are hackable; you can shrink them, make them larger, and change their colors and transparency levels.
To make the borders larger or smaller:
1. Right-click the desktop and select Personalize.
2. Click Window Color and Appearance.
3. Click Open classic appearance properties for more color options.
4. From the dialog box that appears, make sure that Windows Aero is selected as the color scheme. Click the Advanced button on the right side of the dialog box. The Advanced Appearance dialog box appears.
5. Select Border Padding in the Item drop-down menu. To change the size of the border, type a new size for the border. (The default is 4.) Click OK, then OK again. The sizes of the borders will now change.
There's more you can do to the borders as well. To change the border color, transparency and more, right-click the desktop and select Personalize > Window Color and Appearance.
1. Choose a color for your windows on the top of the screen, or custom-build a color by clicking Show color mixer and then moving the sliders that appear to mix your own color.
2. To change the transparency of window borders, move the Color intensity slider to the left to make them more translucent, and to the right to make them more opaque.
3. To turn off transparency, uncheck the box next to Enable transparency.